How to Create Paper Cut in Adobe Illustrator
What Can Be Created by Using The Blend Tool Eps. 03 | Adobe Illustrator Tutorial
This is the third tutorial of creating something with only using the Blend Tool. For this tutorial I just want to show you that the Blend Tool is not only for blend object but more than that the Blend tool is one of the powerful tools that you can use in Adobe Illustrator to create something cooler just to blend objects.
Step 1: Create Background
The first thing that we have to create is the background. Create a rectangle using the Rectangle Tool along the size of the artboard. Set the color with light blue #CBFBFF this time I just want to make it as flat color.Create Blue Background
It's just that simple for the background. Open the Layer Panel to Lock the layer where the backround is and make new layer with “Create New Layer” button.
Layer Panel Adobe Illustrator
Another Adobe Illustrator Tutorial:
Step 2: Create the Paper Cut
Create a Free Shape
In this tutorial we gonna use blend tool to blend a free shape and we gonna make 3 kind of free shape. To create free shapes we can use many kinds of tools, depending on the needs and the shape of the object that we want to create or we can create a free shape from the geometry.In this Adobe Illustrator tutorial I’m Only using the “Pen Tool” and draw free shape like bellow.
The 1st Free Shape
After the first free shape has been completed. Create a new free shape by duplicating the first shape.
Go to the edit menu > Copy.
Go back to the edit Menu > Paste In Place.
Go to the edit menu > Copy.
Go back to the edit Menu > Paste In Place.
Reduce the size of the shape and make some adjustments to it by using the Direct Selection Tool.
For the adjustment, try to make it look smaller and make it as a smooth path.
The 2nd Free Shape
Because we need one more shape to be blended, then we have create the third shape.
Same as before, Go to the edit menu > Copy. Go back to the edit menu > Paste in Place.
Change the size of the object to smaller size. Delete multiple anchor points using the Delete Anchor Point Tool. Until it only have 4 anchor points to get a more simple shape results.
Same as before, Go to the edit menu > Copy. Go back to the edit menu > Paste in Place.
Change the size of the object to smaller size. Delete multiple anchor points using the Delete Anchor Point Tool. Until it only have 4 anchor points to get a more simple shape results.
The 3rd Free Shape
OK, now we just need to blend these objects.
But before we blend them I will give them color first. For the biggest object give the same color as the background color.
Use the “Eyedropper Tool”, and point the cursor to the background to pick sample color.
But before we blend them I will give them color first. For the biggest object give the same color as the background color.
Use the “Eyedropper Tool”, and point the cursor to the background to pick sample color.
For the middle object, give it a red # FF414D. And for the last object give it a dark blue #002E42, Don’t forget to set the stroke to none.
Free Shapes
Now, it's time for them to be blended.
Select the Blend Tool on the Toolbar. Choose the biggest first then the middle and then the smallest.
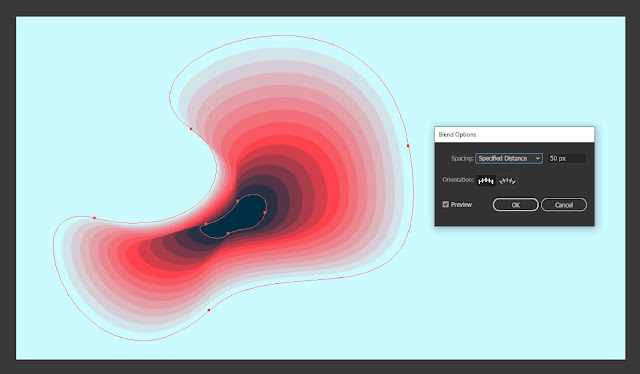
After used the blend tool and completely blended then Double-click the Blend Tool. To bring up the blend option panel, Change the "Spacing" to "Specified Steps". The purpose of the Specified Steps is to allow you to Controls the number of steps between the start and end of the blend. And for the values, just adjust it, for example I fill with 50. And Click OK.
Blending Option Panel and the Result
And that's it. We are done with the Paper Cut in Adobe Illustrator. Now it is your turn to develop various kinds of this paper cut just by utilizing the blend tool features and techniques that I show you.
Another Adobe Illustrator Tutorial:
- How to Create 3d Text Effect Adobe Illustrator Tutorial
- How To Create Skull With Grunge Texture Adobe Illustrator Tutorial
- How To Create Blurry Glass Effect In Adobe Illustrator


0 Comments